Cover Grey Hair Naturally With Henna Hair Dye
If you are not a fan of chemical hair dyes, or have skin sensitivities, there can be limited options when looking for natural alternatives. Henna can come to the rescue here – it has been used since ancient times.
- What is henna and henna hair dye?
- Step-by-step beginner’s guide: How to dye your hair with henna
- Tips for covering grey hairs with henna
- Frequently asked questions about henna
What is henna and henna hair dye?
Henna comes from the plant Lawsonia inermis. The leaves of the plant are dried and crushed into a powder, which can then be used for various applications, including colouring hair. You may also be familiar with its use in traditional cultural body art.
Henna on its own typically imparts a red shade. For natural hair dyes, henna can be mixed with other natural hair dyes to obtain different shades. For example, it’ll be blended with indigo (Indigofera tinctoria) to achieve brown and black shades, or cassia (Cassia obovata) for lighter shades of red.
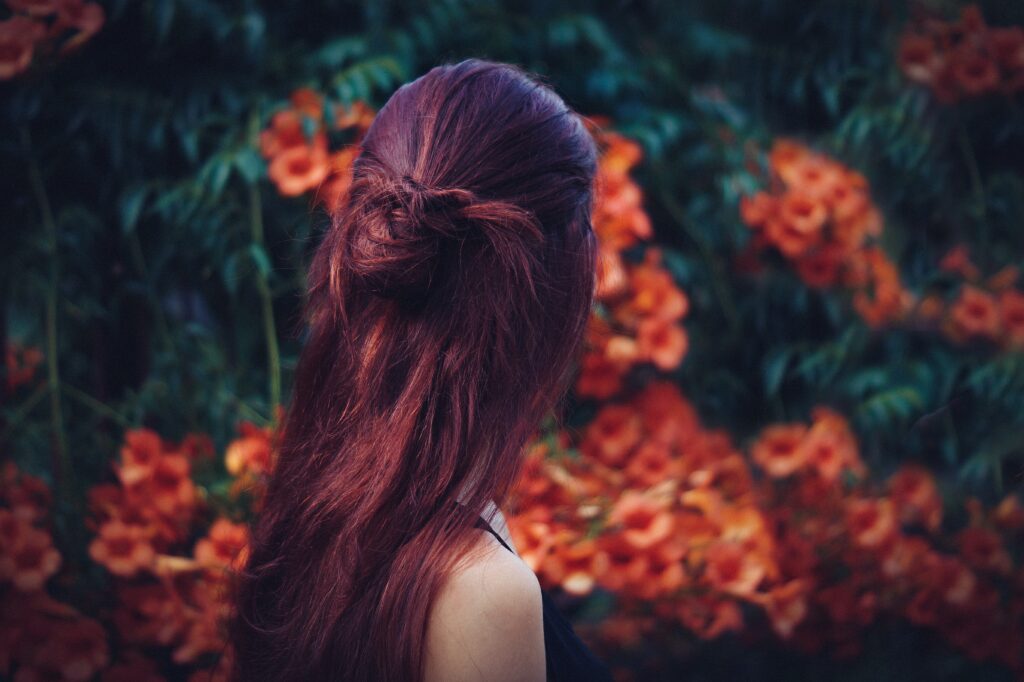
With small children in the house, juggled with work commitments – it’s safe to say I’ve got a few grey hairs! I’ve been using henna hair dye now for almost a year, and have been really pleased with its result. It imparts a very natural tone to my hair, and – after learning some tips and tricks along the way – is very effective at covering greys.
I’ve got the process down pat now, which minimises the mess, ensure it covers greys, and really develops into a semi-permanent hair colouring.
It’s possible to blend your own hair dye using henna, indigo, and other plant powders to achieve your own custom shade. However I would recommend starting out with a well-regarded henna hair dye brand, which is pre-mixed to different hair colours. This makes it much more predictable when you are first starting out, and takes out some of the guess work in achieving the desired colour.
I highly recommend using Desert Shadow’s hair dyes – they are an Australian company, and their dyes are certified organic, using only natural ingredients. They have 12 shades of colour available, ranging from a warm golden blonde, through to red shades, through to browns and blacks.
PLEASE NOTE: This is NOT a sponsored post/review. All opinions expressed here are my own, based upon my personal experience.
Follow the beginners guide below to make a simple process of using henna to dye your hair and cover greys.
Step-by-Step Beginners Guide: How to Dye Your Hair with Henna
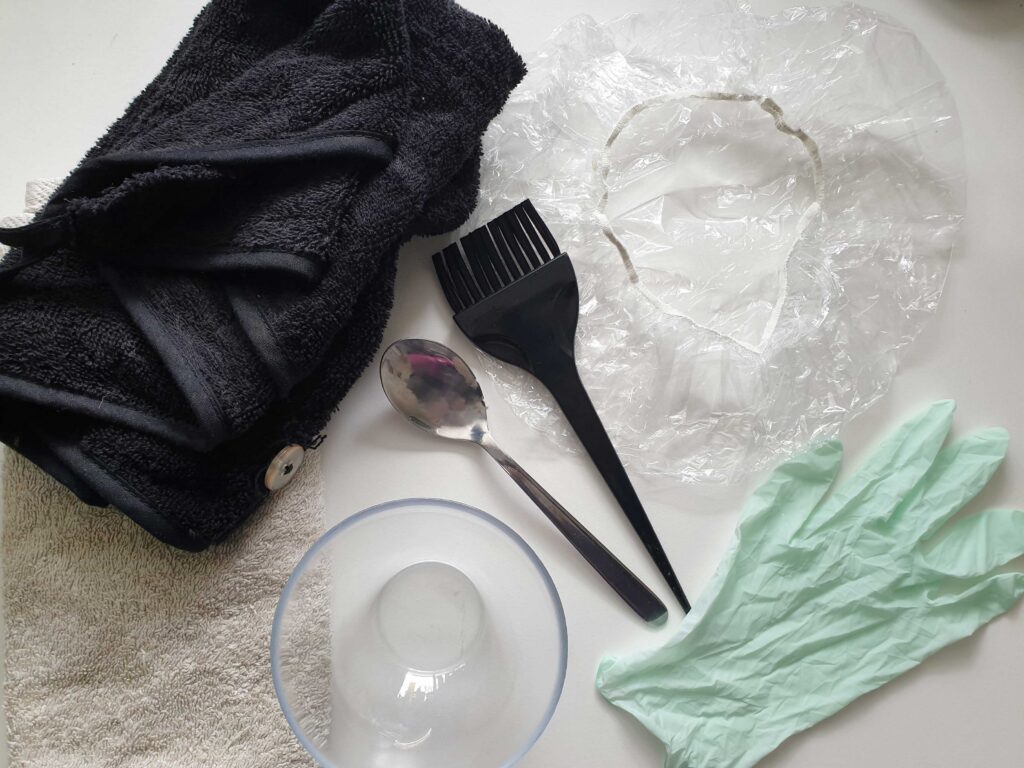
Although not essential, I recommend ensuring you have all of the equipment below. It also helps with the application, and reduces the mess.
Equipment:
- Gloves (these will be included if you use Desert Shadow)
- Hair tinting application Brush
- Bowl
- Spoon
- Towel – I recommend a dark coloured towel, so you don’t have to replace your towels from henna stains (ignore the cream one in the photo).
- Hair towel/wrap – these are the types that can twist into a turban with a button to secure it. Again I recommend a dark coloured one.
- Shower cap – the flimsy disposable ones you might receive as a complimentary toiletry item from a hotel is perfect (although disposable, you can wash and re-use plenty of times).
- Wide-tooth comb – for combing knots out of your damp hair, before application.
Ingredients
- Henna Hair Dye – I recommend Desert Shadow Hair Colour.
- Warm water (not hot!)
- Any other ingredients in the packet instructions for your chosen hair colour. These may include:
- Apple Cider Vinegar (ACV) or Lemon Juice – required if you’re using any dark brown shades from Desert Shadow’s range.
- Salt – recommended for dark brown shades
- Optional: essential oils, honey, herbal teas. These are optional add-ins for improving the scent of your henna hair dye, the consistency, or for adding other benefits.
The Desert Shadow Hair Colours come with a little sachet of spices to improve the scent.
Instructions
Below are the basic instructions for applying henna hair dye.
- Prepare the henna. Follow the instructions from your favoured brand of henna hair dye carefully, including any ACV or lemon juice (if required). Stir it well and try to get most of the lumps out. You want the consistency of yoghurt, but it should not be runny. Add small amounts of water if needed to get the consistency right – the henna should stick to the spoon.
- Activate the henna. Cover the bowl with plastic wrap (although I just use a plastic takeaway container with a lid) and let it activate for the required time. Just leave it on your table, at room temperature.
For blonde or red shades this is only 10 minutes, but for brown colours – this may be 8-12 hours. For brown shades you might need to prepare this overnight, the day before you intend to dye your hair.
NOTE: the Desert Shadow range of brown colours has actually two separate packets of powder that are activated separately. The first step should be activated overnight, but the second step is activated just 10 minutes before you apply, before you mix it with the first step. - Wash your hair. Wash your hair thoroughly, to remove any hair product and oils. Towel dry your hair so that it’s damp. Moisture is important for henna to work effectively, but you don’t want it dripping wet – you’ll just end up with hair dye dripping down the back of your neck.
- Apply the henna.
The process encouraged by Desert Shadow is very similar to the application method for chemical hair dyes by hair dressers. Honestly, if you follow these steps it is much less messier than other described henna applications (where you simply use gloved hands to apply the henna all through your hair. )- Cover your shoulders using the towel, to protect your clothes.
- Comb your hair, to remove any knots.
- Starting at the top of your head, create a straight part through your hair (front to back).
- Apply the henna to the roots on either side of your part, using the hair tinting brush. Ensure the roots are covered thickly. Give the brush a bit of a wiggle as you apply, to get the henna down to the scalp.
- Using the pointy end of the tinting brush, create a new part in your hair (parallel to the first part – about 1cm away). Again, apply the henna on either side of the part, using the tinting brush.
- Continue sectioning your hair in this way – creating new parts through the top of your head, and applying henna. Work your way down to one ear, and then work from the original centre part to the other ear in the same way. Do this until the top part of your head is covered with henna.
- Work the henna through the top lengths of your hair. This part could get a little more messy, and you may need to use gloved hands. Pile the hair onto the top of your hair.
- Apply henna to the back of your head, in a similar way, sectioning areas off with the comb and apply thickly. Apply it through the lengths.
- Wrap your hair. Wrap all of your hair in a shower cap. At this point I also like to give my wrapped head a bit of a massage using my finger tips – just to get the henna really down to my scalp, and to ensure those roots are covered.
Then wrap your entire head using a hair towel/wrap.
Using these 2 steps ensures that the henna is kept moist and warm, which is critical to its effectiveness. Henna dye does not work if it dries out.
The hair towel also serves an extra purpose, in case any bit of watery henna escapes from your shower cap. - Let the henna work for the required period of time. If you’re just looking for a colour change, it could be 1-2 hours. However if you’re wanting to cover greys, you will absolutely need 3-4 hours.
This is the perfect time for catching up on a movie, or a good book! - Unwrap your hair and rinse with water. Conditioner can help to wash out any chunky bits. Do this with your gloves on, to avoid staining!
Tips for covering grey hair with henna
If you have stubborn greys that are a bit colour-resistant, some additional tips and tricks might be needed to achieve full coverage.
Two-step process for brown and black hair – use red henna first
If your hair is naturally brown or very dark, it’s recommended you use a TWO-STEP process for covering your greys.
This involves using a red-shade henna hair dye as a base to tint the grey hairs first, before applying the brown shade henna hair dye.
For me – this is a full day’s endeavour for application (and the process actually starts the night before, with the activation). My process looks like this:
- (Night prior) Start the steps prepare and activate your dark brown henna hair dye. I’ll get this started late at night, so that by the time I wake up the next day, it’s been sitting at room temperature for about 8-10 hours.
- (Day of application) Start the steps to prepare activate the red henna hair dye. Thankfully this is only 10 minutes.
NOTE: At this point I often refrigerate/freeze the activated dark brown henna. The reason is that if you leave henna to activate for TOO long, the hair dye properties of henna will start to decrease and become less effective. Reducing the temperature will slow down this process. I pop it in the fridge now because by the time I wash out the red henna, it may be over 16 hours since I began the dark brown henna activation process, - Wash my hair (I clarify and use a clay wash – see below).
- Comb my hair
- Apply the RED henna. Wrap it up and wait 4 hours.
- Wash out the red henna. I just use water, as I’m about to put through more henna. Towel dry till hair is damp.
- Complete the activation process for the dark brown henna (involves activating the indigo, and blending it with the henna from the fridge).
- Comb my hair.
- Apply the BROWN henna. Wrap it up and wait 4 hours.
- Wash out the dark brown henna.
This is pretty much 8am-4pm for me, in a day. Which is a long time, I know! But I usually plan to do my hair on the same day as ‘house chores’ day, and when I won’t be heading out at all.
Honestly, by the time I get through everything that needs to be done, the hours fly by and my hair is done.
I choose to do it all in one day, but if it were more convenient for you, you could take 4 hours on one day to use the red shade, then use the brown shade the next day (or a few days after, even).

Activate the henna hair dye for the required time
Make sure you follow the instructions and leave your henna to activate henna properly. If you rush this, the hair dye properties of the henna may not be released properly and you’ll get a sub-par result.
For red and blonde henna hair dyes, the activation process is quick – 10-15 minutes.
For brown shades however, the activation process is about 8-12 hours – it’s recommended that you do this overnight. The amount of time is dependent on the room temperature – if its summer (~30 degrees celsius) it might only take 4 hours to complete activation, but winter (~12 degrees celsius) it is around 10 hours.
Additionally, brown shades will require the addition of ACV or lemon juice, to help ‘release’ the properties of henna that will dye your hair. Measure the quantities carefully.
Some additional notes:
- Don’t add any ingredients that aren’t recommended by the henna hair dye product. Desert Shadow hair dyes will call for warm water, ACV and salt (for dark brown and indigo shades), and optionally it’s OK to add a drop or two of essential oils, spices, honey and perhaps some herbal teas. Anything else may cause interact with the henna and make the hair dye less effective.
- Only use warm water – hot water may destroy the hair dye properties of the henna.
…But don’t overactivate your henna
Wait – what?!
Yep – so, not only should you allow sufficient time for the henna to activate, but you should also be careful not to overactivate it.
What does this mean? Basically it’s a cautionary tale to not leave the activated henna for too long, without applying it to your hair.
Once the liquids have been added to henna, the dyes begin to release in the product. Once the activation is ‘complete’ (10 minutes for most colours, but 8-12 hours for brown shades), the hair dye properties will be at their best for a number of hours.
The natural hair dyes will start to lose their colouring power after a certain amount of time. Once your henna hair dye product has been activated, ideally you should apply this to your hair immediately. This allows you can leave it in your hair for the 4 hours necessary for grey coverage, whilst the product is at its optimum.
The exact amount of time that your henna can be left in an activated state depends on the colour. Desert Shadow recommends that their red shades must be used within 8-12 hours of activation, and indigo should be used within 1 hour of activation.
The Desert Shadow brown shades are a bit more complicated as they have a two-step activation process (henna and indigo powders separately). I’ve not found anything that specifically states how long the first step could be left activated in an activated state, but they recommend you activate it 6-12 hours before you intend to use it, and that it should not be left to activate for more than 16 hours.
I can also report that the one time I left the Step 1 of the brown shades to activate for 15-16 hours before I applied it (life got busy!) and noticed that the colour result was less intense.
So I would say their recommendation to only activate it 6-12 hours before you intend to apply it, is true to form. Based on experience I would not leave it beyond 12 hours at room temperature for activation, to make sure I could get the full 4 hours in my hair (up to the 16 hours they recommended).
Based on the above, here’s a quick summary:
| Desert Shadow hair colour | Activation Time | Max time it can be left activated |
|---|---|---|
| Red shades | 10 minutes | 8 hours |
| Brown shades – Step 1 | 6-12 hours | 1 hour |
| Brown shades – Step 2 | 10 minutes | 1 hour |
| Indigo | 10 minutes | 1 hour |
Help! I’ve activated my henna but I don’t have time to use it!
Life can get in the way, and your plans for a day-in to do your hair can get thwarted quickly.
Fear not – Desert Shadow recommends that red and brown shades can be frozen for up to 3 months, once they have been activated. Just make sure you leave them on the counter to defrost (no microwaving!)
Note that this is not possible with indigo (this includes the Step 2 of the brown shades) – once activated, it must be used within the hour.
Be generous with your henna application
If you are needing henna to cover your greys, expect to leave it in your hair for at least 3-4 hours (4 hours ideally). This will give it sufficient time to really penetrate the hair shaft, and last longer.
Initially I tried it for 2.5-3 hours and although the initial result was great, I found that it washed out very quickly.
The first few times, don’t skimp on the amount of henna you use. Really apply it thickly and smush it into your scalp to get nice, even coverage.
When it comes to using henna as a natural hair colour, time is of critical essence. It’s a natural product, and you should not expect that you will get the same speedy results as with using a chemical hair dye.
Use some heat
Henna works better with a bit of heat – try a heated showercap. Or if you can sit back and relax on the couch, you could get away with a heated wheat pack placed on your hair towel.
Just remember that the henna itself must stay moist for it to be effective.
Clarify your hair
It’s important to clean your hair before you apply henna, to make it as squeaky clean as possible. This is a big one if you have naturally oily air.
Things such as hair product, natural hair oils and silicones (which might come from your conditioner) can reduce the ability for the colour to absorbed by your hair.
Although I stick with very natural shampoos generally, I will specifically use a more clarifying shampoo prior to applying henna.
If you find your greys are particularly resistant, you may wish to try for a clay rinse as well.
Clays are well-known for their abilities to draw out impurities and oils. If you have ever tried a DIY clay rinse or mask in your hair to make it extra squeaky clean, you will notice you’ll be recommended to use some apple cider vinegar with it. The reason is that the clay opens up the hair cuticles, and the ACV will help seal them. If you use clay on its own, your hair will often feel a bit rough afterwards (but the ACV will make everything smooth again).
I’ve started adding a quick clay rinse (1 tsp of rhassoul clay, with a cup of warm water) just before I apply my henna – the idea being to open up the hair cuticles to really allow the henna colour to penetrate deeper.
Patience
Be patient and consistent – henna can be a very effective semi-permanent hair colour if you allow the colour to build.
Don’t be disappointed if you try it and find it’s washed out quickly the first time – experment with the tips in this article, and over time the colour will continue to build up and you will be able to extend the time between re-colours.
The very first time I tried henna, I found that my greys were visible again after 2 weeks. Disheartening. It’s difficult to say why – although I used the two step process from the get-go, I think I only let each dye sit for 3 hours initially (that’s 3 hours for the red, then 3 hours for the brown).
But I persevered and re-applied the dye again after 2 weeks (before it had completely washed out of my greys – I didn’t want to squander any colour build up). This time the colour held a lot better, and I waited 3 weeks before applying again. And the next time was 4 weeks.
After 3 or 4 months, the colour became pretty much semi-permanent, and I now touch up my roots every 5-6 weeks.
Reduce your hair wash schedule
OK, this isn’t strictly a tip for colour-resistant greys, but it does help with maintaining your colour for as long as possible.
As with all hair dyes – reducing the regularity of your hair washing will help with colour retention.
Try to wash your hair with shampoo 2-3 times a week, at most.
You can try a dry shampoo on your non-wash days, and if you exercise regularly – try giving your hair a cool rinse to get rid of the sweat.
It might take some experimentation to find a washing schedule that works for you, and also helps to maintain your hair colour.
Frequently asked questions about henna
Is henna right for me?
Henna hair dye is a great option if you want to avoid chemicals, but still want to cover your greys.
Just be aware that without the assistance of chemicals, using natural hair dye products such as henna can be a lengthy process. If you are a brunette and wanting to cover greys, you’re looking at at overnight process to activate the product, then a full day’s effort to colour.
However, I like to think that good things come to those who can wait – that includes being good to your hair, your body, your health, and the planet.
Can henna lighten my hair?
No. Henna is a natural product, and there are no bleaching chemicals. For this reason, you can never expect that henna can lighten your hair.
I have black hair – will henna work for me?
Not if you’re wanting a colour change – as henna has no bleaching chemicals, it’s not possible to lighten your dark hair and then change its colour.
You might expect to see a shimmering red-tone when in the sunlight, though.
In saying that – I have what most people call black hair (though it’s technically very dark brown-black) and I still use henna hair dye, to cover up my greys.
My hair has been dyed chemically – can I use henna?
When it comes to Desert Shadow Hair Colours, they advise that it can be used over the top of previously coloured hair. This is because Desert Shadow colours do not contain metallic salts or other chemicals.
If you’re using a different brand, check the ingredients carefully, in case chemicals or metallic salts are additives.
If in doubt, you can do a strand test to make sure there aren’t any unexpected or unintended reactions.
I’ve tried henna – can I use a chemical hair dye afterwards?
Desert Shadow’s recommendation is that you should not try to lighten or bleach your hair chemically, after using a henna hair dye.
Henna is semi-permanent, which means that it needs to be grown out.
Again, a strand test might be the best option here.
Does henna hair color cover gray hair?
YES! As long as you follow the process carefully, you can definitely expect that your greys can be covered effectively.
For brunettes and dark-haired beauties, this may involve a two-step process where you need to first tint the greys with a red shade, before using a brown shade.
Why is henna not covering my grey?
Henna can definitely cover your grey hairs effectively, but it can be a bit of a process that requires some patience. Taking short cuts in the process may impact how well your greys get covered!
Check that you are:
- Preparing the henna hair dye according to the instructions
- Leaving the henna in long enough – an absolute minimum of 3 hours.
- Applying the henna to squeaky clean hair
- If you are brunette, you might need to first apply a red henna hair dye, before applying the brown henna.
How long will henna last for in my hair?
Initially you may notice some fading after 4-6 weeks.
With consistent use, you can expect henna to be a semi-permanent product.
For me, the greys are still dyed at the 5-6 week mark (apart from the roots, of course), but they are a slightly more reddish tone closer to the new roots. Further down the length of the hair shaft (which have been dyed repeatedly) they are still dark brown/black.
Will henna hair dye stain my skin?
If you’re very worried about this, you can put some lip balm or oil around your hairline, before applying the henna hair dye.
I was a bit concerned about this myself initially (henna can be used as body art, after all – and the beautiful designs may stay there for weeks!), however with Desert Shadow I now omit using the lip balm completely and don’t have any issue with any staining.
Does henna smell bad?
It depends – it’s very much an individual thing.
Henna is a natural plant product and it smells very earthy to me, rather than necessarily ‘bad’. I’ve actually gotten very used to it (and can report that my kids no longer complain about it – haha!)
The smell does reduce after a few shampoos, and you can add a few drops of essential oils or spices to the henna mix, to improve the smell.
Desert Shadow also suggest a rose water rinse can help get the smell right out (though I’ve not tried this).
Can I leave henna in overnight?
There’s no harm in leaving the henna hair colour in overnight, but generally the colouring power will be maxed out after 5-6 hours in your hair.
I have heard of some people going to sleep with it in their hair for convenience. This certainly does take the effort out of colouring your hair over an entire day.
For me – I think I would fear for my bed sheets!
I hope my experience with using henna hair dye has been useful – please give me a shout below, if any of these tips have been helpful!
I’d love to hear if you’ve got any other tips to share when it comes to using henna hair dyes, or if there are similar henna hair dye products you can recommend.

DIY Natural Liquid Hand Soap

Homemade Insect Repellent recipe
